Admissions Open 2026 | Hotel Management & Culinary Arts Courses Available | 100% Placement Assistance | Call Now: +91 40 27154304, 27171591
Categories Recipes

Lagan nu Custard

Introduction

This delightful baked custard is a rich and creamy dessert made with full cream milk, aromatic spices, and a hint of vanilla. Slow-cooked to perfection and baked until golden brown, it offers a comforting blend of traditional flavors with a modern touch. Perfect for special occasions or a sweet ending to any meal.


Ingredients

  • 1 lit Full cream milk
  • 3 gms Nutmeg
  • A pinch saffron (as required)
  • 35 gms Butter
  • 125 gms Fresh cream
  • 5 Green cardamom
  • 3 ml Vanilla essence
  • 3 Eggs
  • 150 gms Sugar

 Method

  1. Boil milk and sugar till the milk is reduced to half of its actual quantity.
  2. Add half of the nutmeg, some almonds, and vanilla essence to the milk and mix well. Once done, keep it aside to cool down.
  3. Meanwhile, preheat the oven at 180°C and grease a baking tray using butter.
  4. Next, take a bowl and beat the eggs. Add cream and the beaten eggs to the reduced milk mixture.
  5. Pour this mixture into the greased baking tray, sprinkle the remaining nuts over it, and place it in the oven for 30 minutes or until the top turns brown.
  6. Use a skewer/toothpick to check if the custard is baked properly. If it comes out clean, it means the custard is done.
  7. Take out the custard from the oven and let it cool down. Transfer it to a serving plate, decorate with chopped nuts, slice, and serve warm.

 Chef Tips

  • Always let the milk mixture cool slightly before adding eggs to avoid curdling.
  • For a richer flavor, soak saffron in warm milk before adding.
  • Use fresh nutmeg for better aroma and taste.
  • Do not overbake, as it can make the custard rubbery.

Serving Suggestions

  • Serve warm for a comforting dessert experience.
  • Garnish with chopped almonds, pistachios, or a few strands of saffron.
  • Pair with a scoop of vanilla ice cream for a fusion twist.
  • Can also be chilled and served cold for a refreshing variation.

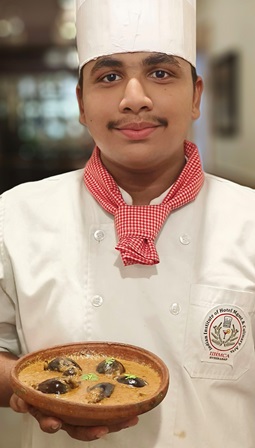
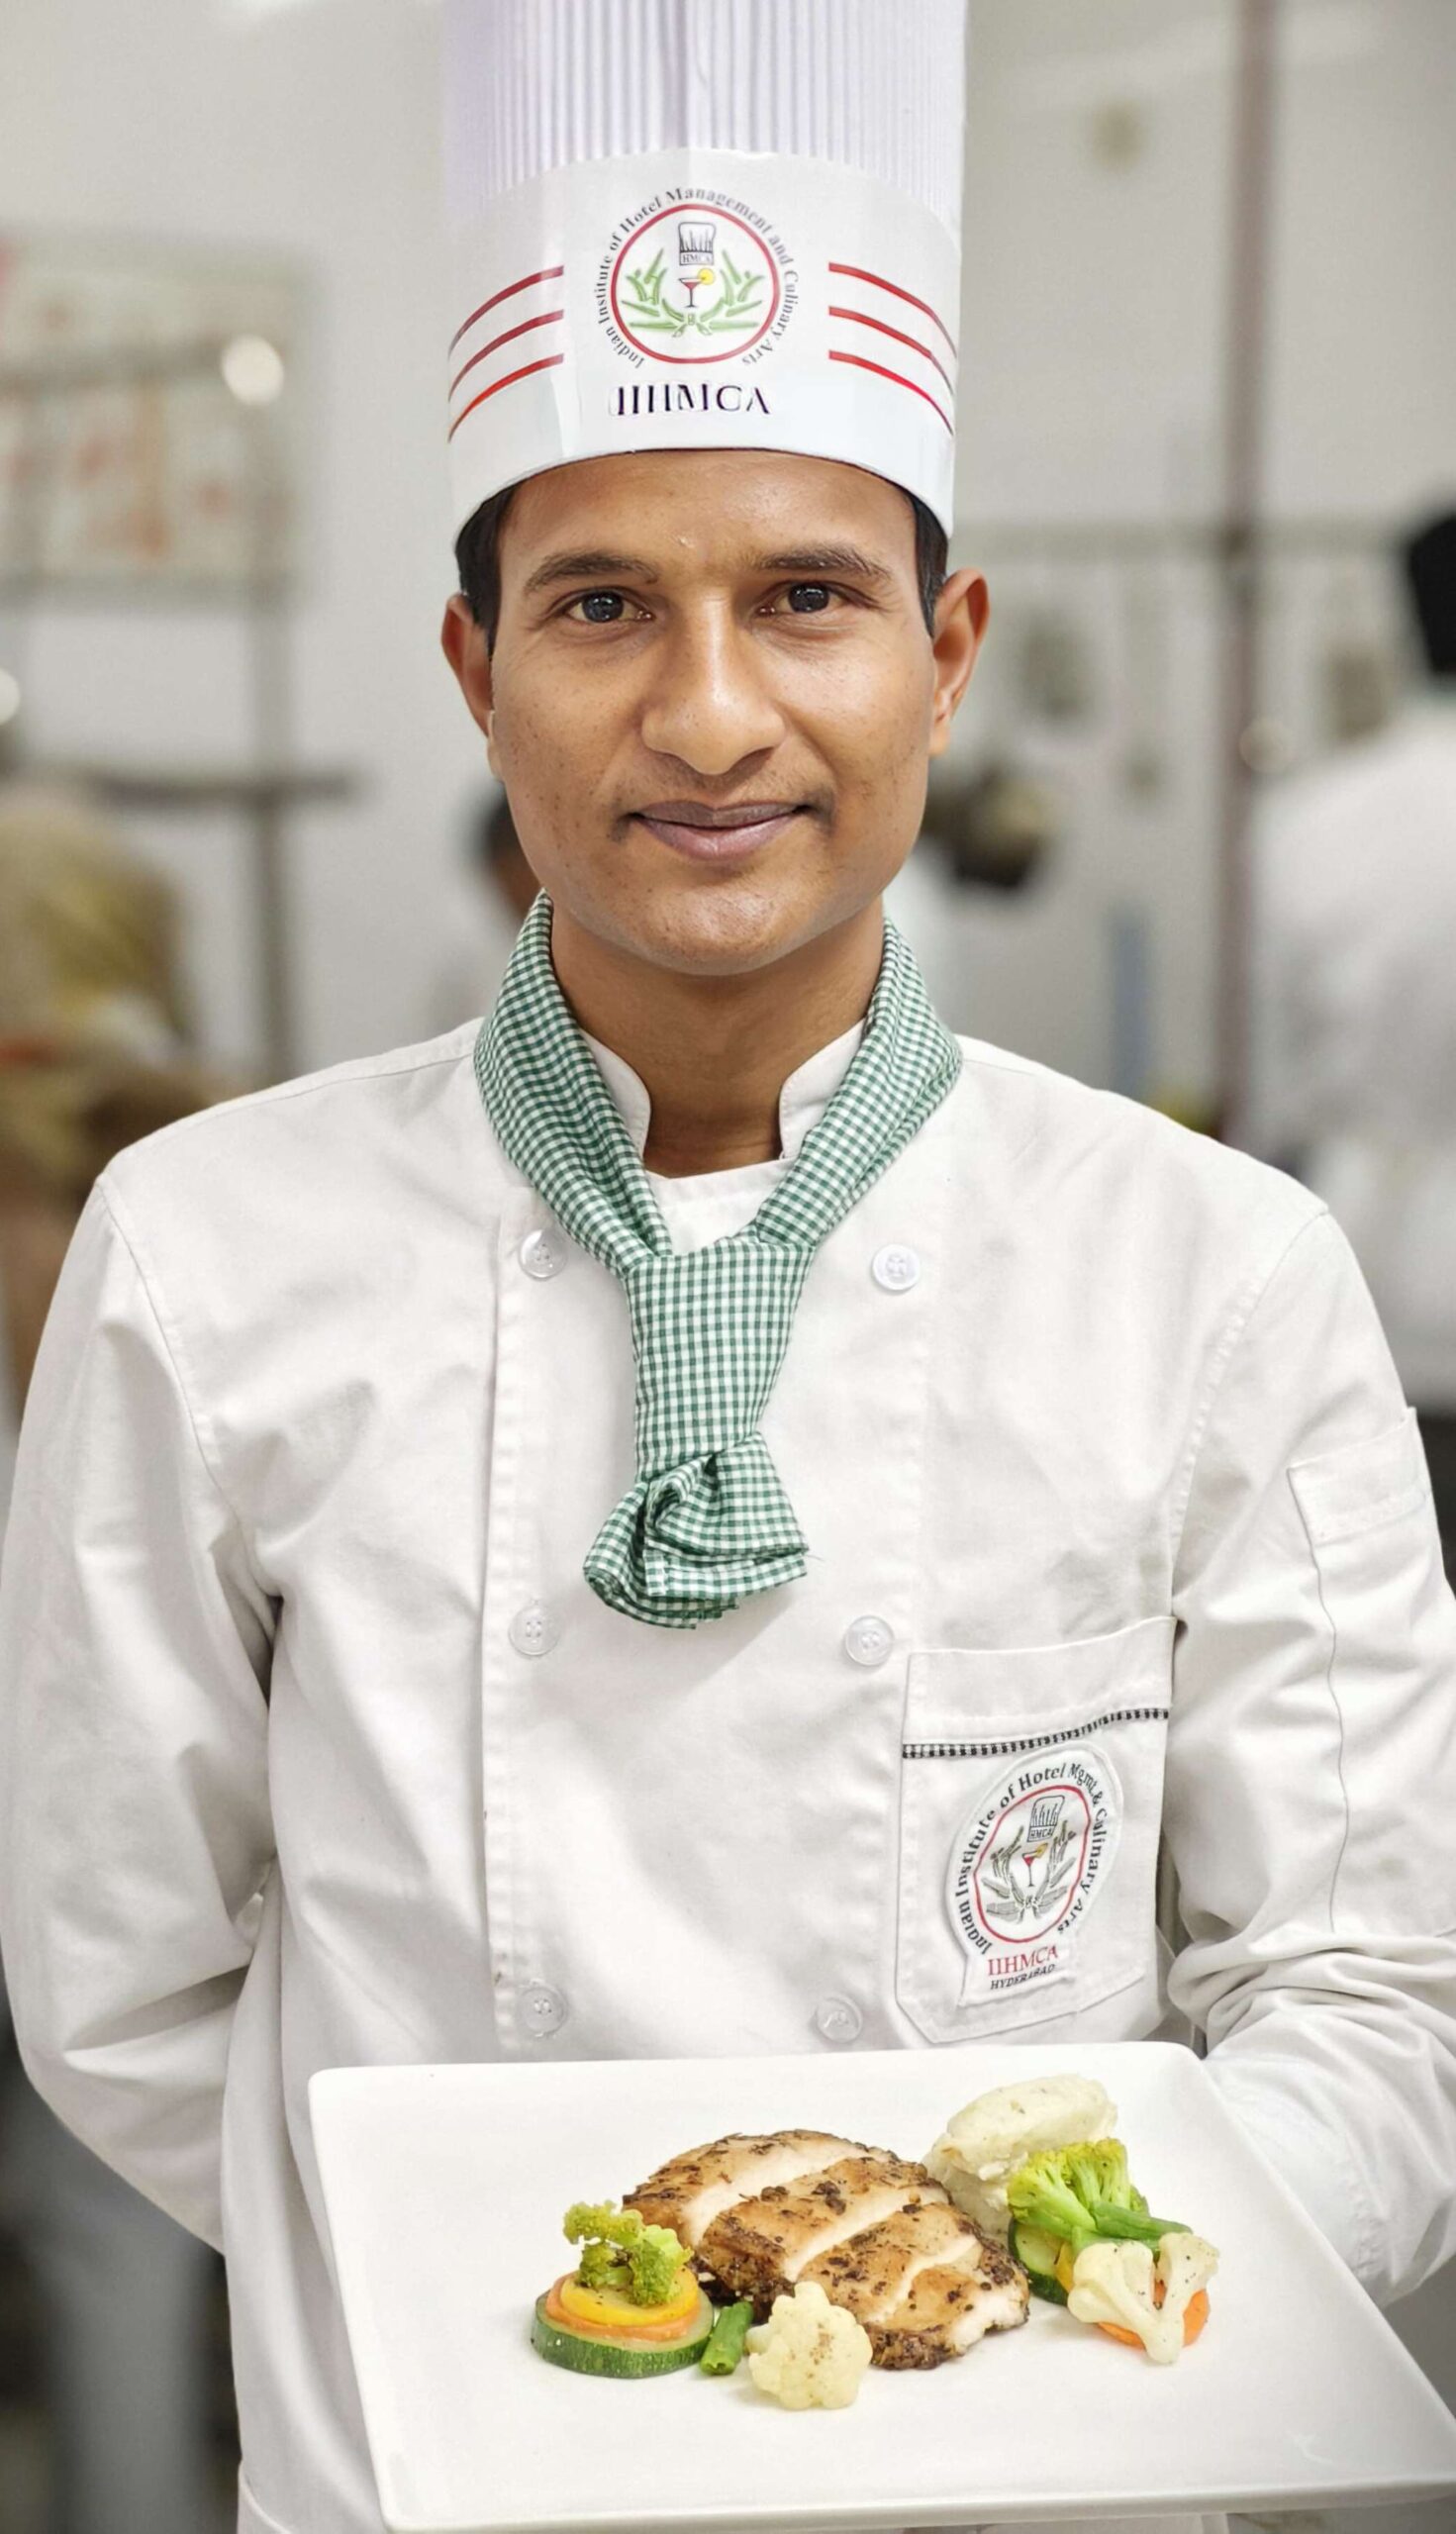
Mr. Kartikeya (DFPCA)
Indian Institute of Hotel Management and Culinary Arts (IIHMCA)

Mr. Kartikeya has been selected as Chef of the Day for his outstanding culinary skills and dedication to mastering the art of cooking. His passion, creativity, and eagerness to learn make him a promising talent in the culinary world.


Join IIHMCA

Step into the world of culinary excellence with the Indian Institute of Hotel Management and Culinary Arts (IIHMCA). Learn from industry experts, gain hands-on experience, and turn your passion for cooking into a successful career.

Categories Recipes

Godeungeo Gui – KOREAN GRILLED FISH

Introduction

This dish highlights the rich, natural flavor of fresh mackerel (godeungeo) enhanced with citrus, ginger, and garlic. Paired with a buttery lemon-parsley sauce and sautéed vegetables, it offers a perfect harmony of freshness, spice, and richness—ideal for both fine dining and healthy gourmet meals.


 Ingredients

  • 1 no – Fresh godeungeo (mackerel with skin), filleted into 2 or 4 pieces
  • 8 gms – Salt (preferably sea salt)
  • 1 no – Juice from lemon
  • 8 gms – Ginger juice
  • 10 gms – Garlic, chopped
  • 8 gms – Black pepper, crushed
  • 12 ml – Lemon butter (for basting)
  • 2 sprigs – Parsley
  • 100 gms – Cauliflower, broccoli, carrot & beans
  • 20 ml – Soy sauce
  • 15 ml – Oil
  • 20 ml – Butter
  • 1 no – Lemon
  • 3 sprigs – Parsley, chopped

 Method

 Preparation

  • Cut crosswise slashes on the skin side of the fish.
  • Pat dry using a paper towel.
  • Drizzle ginger juice, garlic, and lemon juice over the fish.
  • Season generously with salt and pepper.
  • Rest for 20–30 minutes.
  • Shake off excess salt before cooking.

 Cooking Methods

1. Grilling

  • Clean and lightly oil the grill. Preheat on medium-high heat.
  • Place fish skin-side down.
  • Cook for 2–3 minutes until golden and opaque.
  • Flip and cook for another 2 minutes.

2. Pan-Frying

  • Heat oil in a skillet over medium-high heat.
  • Place fish skin-side down.
  • Cook for 2–3 minutes until crisp and golden.
  • Flip and cook the other side for 2 minutes.

 Sauce Preparation

  • Preheat a skillet.
  • Add butter and oil.
  • Sauté chopped garlic.
  • Add black pepper, salt, and lemon juice.
  • Mix in melted butter and chopped parsley.

Chef’s Tips

  • Always pat the fish dry to achieve crispy skin.
  • Do not overcrowd the pan or grill—this ensures even cooking.
  • Use fresh lemon juice for a brighter flavor.
  • Avoid overcooking; mackerel should remain moist inside.
  • Let the fish rest briefly after cooking for better texture.

 Serving Suggestions

  • Serve hot with sautéed vegetables tossed in soy sauce and butter.
  • Drizzle the lemon butter sauce over the fish just before serving.
  • Garnish with fresh parsley and lemon wedges for a vibrant presentation.
  • Pair with steamed rice or light mashed potatoes for a complete meal.

Chef of the Day – Congratulations Mr. Yash (BCTCA 2nd Sem)

IIHMCA proudly recognizes Mr. Yash as the Chef of the Day—a dedicated, diligent young aspirant with exceptional talent in culinary arts. His passion and precision shine through this beautifully balanced dish of grilled/pan-fried mackerel with lemon butter sauce.


 Join IIHMCA

Passionate about cooking like Chef Yash? Become part of IIHMCA and explore the world of professional culinary arts. Build skills, gain hands-on experience, and showcase your talent on a professional platform


Categories Recipes

SALI MURGHI

Introduction

This dish, Sali Murghi, is a rich and flavorful chicken preparation that beautifully balances tangy, spicy, and slightly sweet notes. Tender marinated chicken is cooked in a robust gravy infused with aromatic spices, finished with crispy potato straws (sali) for texture and indulgence. It is a classic comfort dish, perfect for festive meals or gourmet dining experiences.


Ingredients

For Chicken Curry

  • 1 kg – Chicken (curry cut)
  • 150 gms – Onion (chopped)
  • 30 gms – Ginger garlic paste
  • 200 gms – Curd
  • 4 nos – Green chilies (paste)
  • 150 gms – Tomatoes (pureed)
  • 25 gms – Red chilli powder
  • 20 gms – Turmeric powder
  • 20 gms – Cumin powder
  • 15 gms – Coriander powder
  • 5 gms – Garam masala
  • 10 gms – Jaggery
  • 25 ml – Vinegar
  • 30 ml – Vegetable oil
  • 20 gms – Black pepper powder
  • 3 nos – Bay leaves
  • 2-inch – Cinnamon stick
  • 3 nos – Black cardamom
  • 5 nos – Green cardamom
  • Salt to taste

For Paste

  • 45 gms – Onion
  • 15 gms – Red chilies
  • 10 gms – Ginger
  • 10 gms – Garlic
  • 100 ml – Water

For Sali (Crispy Potatoes)

  • 5 nos – Large potatoes
  • 5 gms – Salt
  • 1 litre – Vegetable oil (for deep frying)

Method

Preparation

  • Wash chicken thoroughly.
  • Marinate with ginger garlic paste, onion paste, green chilli paste, curd, salt, and turmeric powder.
  • Rest for 2–3 hours for best flavor absorption.

Cooking Method

  1. Heat oil in a thick-bottomed pan.
  2. Add bay leaves, cinnamon, green and black cardamom; sauté until aromatic.
  3. Add chopped onions and fry until golden brown.
  4. Add ginger-garlic paste and cook for 2–3 minutes.
  5. Add tomato puree and cook until oil separates.
  6. Add cumin, coriander, turmeric powder, and jaggery; cook for 5 minutes.
  7. Add vinegar and mix well.
  8. Add marinated chicken and cook on low flame for 10 minutes.
  9. Add about 2 cups of hot water, cover, and cook for 20 minutes.
  10. Adjust salt and cook until gravy thickens and turns rich red.

Sali Preparation

  1. Cut potatoes into thin matchstick strips.
  2. Soak in salted water for 15 minutes.
  3. Heat oil and fry potatoes in small batches on low flame.
  4. Fry until crisp and golden brown.
  5. Drain and keep aside.

Final Assembly (Sali Ma Marghi)

  • Mix ⅔ of fried potatoes into the chicken curry.
  • Garnish with the remaining crispy potatoes on top.

Chef’s Tips

  • Marinate chicken longer for deeper flavor.
  • Cook onions slowly to achieve perfect caramelization.
  • Maintain low flame while cooking to keep chicken tender.
  • Fry potatoes in batches to ensure crispiness.
  • Balance tanginess and sweetness with vinegar and jaggery carefully.

Serving Suggestions

  • Serve hot with naan, roti, or steamed rice.
  • Garnish with fresh coriander for added freshness.
  • Pair with a light salad or raita for a complete meal.

Chef of the Day – Congratulations Mr. Chandrakanth (DFPCA)

The Indian Institute of Hotel Management and Culinary Arts proudly recognizes Mr. Chandrakanth as the Chef of the Day. A talented and dedicated student, he consistently strives to master the art of cooking. His passion, discipline, and creativity are clearly reflected in this delicious and well-executed dish.


Join IIHMCA

Inspired by Chef Chandrakanth’s journey?
Join IIHMCA and step into the world of professional culinary arts. Gain hands-on experience, refine your skills, and showcase your talent on a prestigious platform. Your culinary dream starts here!

Categories Recipes

VEG CUTLET

Introduction 

Veg cutlet is a popular, crispy, and flavorful snack made with mixed vegetables and aromatic spices. Golden on the outside and soft on the inside, these cutlets are perfect as a tea-time snack or starter, loved for their crunchy texture and delicious taste.


 Ingredients

For Cutlet Mixture:

  • 150 gms chopped carrot
  • 100 gms chopped french beans
  • 250 gms chopped potatoes
  • 125 gms frozen green peas
  • 15 gms ginger – roughly chopped
  • 4 nos green chili
  • 10 gms garlic cloves – roughly chopped
  • 5 gms red chili powder
  • 6 gms cumin powder
  • 5 gms coriander powder (optional)
  • 5 gms garam masala
  • 250 gms breadcrumbs
  • 50 gms chopped coriander
  • Salt as required

For Crumb Coating:

  • 100 gms refined flour
  • 45 ml water
  • 200 gms breadcrumbs (panko or regular)

For Pan Frying:

  • 50 ml oil (any neutral oil, add as required)

Method

Preparation:

  1. Rinse, peel, and chop carrots, potatoes, and french beans.
  2. Boil potatoes until soft, then drain and cool.
  3. Steam or boil other vegetables until fork-tender.
  4. Drain all excess water using a strainer.

Cooking the Vegetables:

  1. Heat butter and oil in a pan and sauté the vegetables briefly.
  2. Set aside to cool completely.

Preparing Breadcrumbs:

  1. Blitz 4–5 bread slices into fine crumbs using a blender.
  2. Spread on a plate and keep aside.

Making Cutlet Mixture:

  1. Mash boiled potatoes and vegetables well.
  2. Crush ginger, green chilies, and garlic into a semi-fine paste.
  3. Add spice powders, coriander leaves, and salt.
  4. Mix thoroughly to form a uniform dough. Adjust seasoning if needed.

Shaping & Coating:

  1. Mix refined flour and water to make a smooth slurry.
  2. Shape the mixture into small or medium oval cutlets.
  3. Dip each cutlet in slurry, then coat evenly with breadcrumbs.

Pan Frying:

  1. Heat oil in a pan for shallow frying.
  2. Place cutlets in medium-hot oil.
  3. Fry until golden and crisp on both sides, flipping occasionally.
  4. Drain on paper towels to remove excess oil.

Chef Tips

  • Ensure vegetables are completely drained to avoid soggy cutlets.
  • For extra crispiness, use panko breadcrumbs.
  • Chill shaped cutlets for 15–20 minutes before frying to help them hold shape.
  • Add a squeeze of lemon juice or a pinch of chaat masala for enhanced flavor.

 Serving Suggestions

Serve hot or warm with:

  • Mint chutney 
  • Tamarind chutney 
  • Tomato ketchup 

Chef of the Day: Ms. SAPNA (FPP)

A dedicated and diligent young aspirant, Ms. Sapna has showcased exceptional skill and passion in culinary arts. Her creativity and precision have earned her the title of Chef of the Day at IIHMCA.


 Join IIHMCA

If you are passionate about cooking like Chef Sapna, IIHMCA is the perfect place to begin your culinary journey. Learn from experts, gain hands-on experience, and turn your passion into a profession!

Categories Recipes

Vegetable Quiche

Introduction

This delightful Vegetable Cheddar Quiche is a perfect blend of buttery pastry, rich cheese, and fresh vegetables. It’s a classic dish that combines a crisp crust with a creamy, savory filling—ideal for brunch, lunch, or a light dinner. Packed with nutrition and flavor, it reflects both comfort and elegance on a plate.


 Ingredients

  • 225g/8oz plain flour
  • 140g/5oz butter, chilled, diced
  • 115g/4oz mature Cheddar, grated
  • 115g/4oz peas
  • 115g/4oz baby broad beans
  • 115g/4oz potatoes, chopped
  • 115g/4oz green beans, chopped
  • 100g/4oz carrots, chopped
  • 4 free-range eggs
  • 200ml/7fl oz double cream
  • 100ml/3½fl oz whole milk
  • Small bunch flat leaf parsley, chopped
  • Sea salt and freshly ground black pepper
  • 5 baby plum tomatoes, chopped

Method

  1. Sift the flour into a large bowl and rub in the butter until the mixture resembles breadcrumbs.
  2. Mix in the cheese and just enough chilled water to bind the mixture together. Wrap the dough in cling film and place in the fridge for 15 minutes.
  3. Roll out the pastry on a floured work surface and use it to line a greased 25cm/10in tart tin. Chill in the fridge for 30 minutes.
  4. Preheat the oven to 190°C/375°F.
  5. Meanwhile, steam or boil the peas, broad beans, diced carrots, potatoes, and green beans until al dente, then drain. Refresh the vegetables in iced water and drain well.
  6. Line the chilled pastry case with aluminium foil and baking beans and bake for 15 minutes.
  7. Beat the eggs, cream, and milk in a bowl, then add the parsley and season with salt and freshly ground black pepper.
  8. Remove the tart tin from the oven, discard the aluminium foil and baking beans, and reduce the oven to 180°C/350°F.
  9. Place the tart tin on a baking tray, arrange the blanched vegetables and tomatoes over the base of the pastry case, and pour over the egg mixture. Bake for 30–40 minutes or until the filling is set.
  10. Remove the quiche from the oven and allow it to cool slightly before removing from the tin.

 Chef Tips

  • Keep the butter cold while making the pastry to achieve a flaky crust.
  • Blind baking (pre-baking the crust) prevents a soggy base.
  • Do not overcook vegetables—al dente keeps texture and color vibrant.
  • Let the quiche rest before slicing for clean, neat portions.
  • Add a pinch of nutmeg to the egg mixture for an extra depth of flavor.

 Serving Suggestions

  • Serve warm or at room temperature with a fresh green salad.
  • Pair with a light soup for a wholesome meal.
  • Ideal for brunch buffets, picnics, or tea-time snacks.
  • Garnish with extra parsley or grated cheese for presentation.

Chef of the Day – Ms. Nisha (BCTCA 6th Sem)

IIHMCA proudly celebrates Ms. Nisha as the Chef of the Day! A dedicated and diligent young aspirant, she has showcased exceptional talent in culinary arts through her creativity, precision, and passion for cooking.


 Join IIHMCA

If you are passionate about culinary arts like Chef Nisha, IIHMCA is the perfect place to nurture your talent. With expert guidance, hands-on training, and real-world exposure, you can turn your passion into a successful career in hospitality and culinary excellence.

Categories Recipes

PAN FRIED PRAWNS WITH PICKLED VEGETABLES

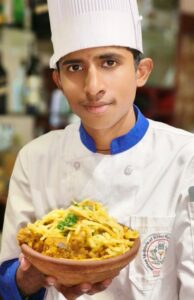
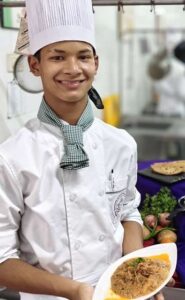
   Student selected for the Chef of the day is Mr.KALYAN ( BCTCA 6TH SEM ) of Indian Institute Hotel Management and Culinary Arts for showcasing exemplary skills. He is very talented student, always striving to learn the art of cooking.

Ingredients

400g           Raw prawns

Do Chua Pickling Vegetables
100g             Carrot, peeled and julienned
200g             Daikon, peeled and julienned
8g                  Salt


Do Chua Pickling Liquid
200ml           water
200ml           white vinegar
2 tbs.             caster sugar
200g cucumber, peeled and julienned
200g cherry tomatoes, quartered
1 red onion, thinly shaved
2 tbs.             Asian fried shallots
2 cups           coriander leaves, loosely packed
2 cups mint leaves, loosely packed

Sour Salad Dressing
2                    limes, juiced
30g                palm sugar
50g                fish sauce
1                     large red chilli, finely chopped

For the Do Chua pickled vegetables, rub the julienned daikon and carrot with the salt and allow to stand in a strainer for 20 minutes to extract excess liquids and soften. Rinse under running water and combine with the pickling liquid. Refrigerate for at least 1 hour.
For the prawns, split them lengthwise from the head down but leave them connected at the tail end. Poach in boiling salted water for 1-2 minutes until just cooked. Drain and set aside.
To make the dressing, grate the palm sugar into the lime juice and fish sauce and stir through the chopped chillies. Leave for at least 10 minutes to infuse. You may need to adjust the sweetness depending on the flavour of the limes.
To assemble the salad, toss the prawns, pickled vegetables (strained), cucumber, red onion, cherry tomatoes, mint and coriander together and dress with the dressing.
Scatter with the fried shallots and serve.

Ingredients

Pickled Vegetables

  • 1 small daikon (about 10 oz/280g), peeled
  • 1 large carrot, peeled
  • 2 Persian cucumbers, peeled (half of an English cucumber or 2 small Japanese cucumbers work also)
  • 1/2 cup (118ml) + 2 TBS rice vinegar
  • 1/4 cup (48g) sugar
  • 1 tsp fish sauce
  • 1 tsp sesame oil

Soba Noodles

  • 3 bundles of soba noodles (~13 oz/360g)
  • 1/3 cup (~80ml) soba sauce (soba tsuyu)
  • 2 TBS low-sodium soy sauce, add more to taste
  • 2 tsp sesame oil

Pan-Fried Shrimp

  • 1 lb (~450g shrimp), shelled
  • 1 1/2 TBS olive oil for frying
  • pinch of salt
  • pinch of garlic powder

Garnish

  • 1 large red bell pepper, thinly sliced
  • 1 cup 95g shredded red cabbage
  • 1 scallion, finely chopped
  • sesame seeds

Instructions

  1. Cut the daikon, carrot, and cucumbers into matchsticks. In a medium bowl, mix the vinegar, sugar, fish sauce, and sesame oil. Place the vegetables in the bowl, mix it with the liquid, and wrap the bowl with plastic wrap. Refrigerate for at least 3 hours or overnight.
  1. To prepare the noodles, bring about 5 cups of water to boil in a large saucepan. Once the water boils, place the noodles in the saucepan. The noodles will curl naturally. When the water starts to boil again, reduce the heat to medium, and let the noodles cook for a few more minutes. When the noodles are done, drain and run the noodles under cold water.
  2. Pour the noodles into a large bowl, and add the soba sauce, soy sauce, and sesame oil and mix.
  3. To pan fry the shrimp, heat a skillet with the olive oil over medium-high heat. When the pan is hot, place the shrimp in one layer on the pan. Let it cook for a few minutes or until the shrimp start to turn orange and curl. Flip the shrimp onto the other side and let it cook for a few more minutes. Season the shrimp with a pinch of salt and garlic powder. Turn off the heat.
  4. Serve the noodles with some shrimp, pickled vegetables, red peppers, cabbage, and the other garnish.
Categories Recipes

WHISKEY MAPLE COFFEE COCKTAIL

Ms. MOUMITA ( BCTCA 6th sem ) is a budding Bartender who is keen to make her career in Bar outlet. She has been nominated by Indian Institute of Hotel Management and culinary arts as the Bartender of the day.

INGREDIENTS
60 ml Jameson Whiskey
60 ml Cold Brew Coffee
8 ml Maple syrup
30 ml Whipped cream
As required Crushed ice
5 nos Coffee beans, toasted


Method:
1. In a cocktail shaker, add whiskey, freshly brewed cold coffee, maple syrup and ice.
2. Close the cocktail shaker and shake it well.
3. Chill a tall glass with ice and chill it well.
4. Remove the ice and place crushed ice till half full.
5. Pour the cocktail onto the ice. Top it with whipped cream.
6. Garnish it with toasted coffee beans. Serve chilled.

Categories Recipes

MUTTON HALEEM

Introduction

This dish is a rich, wholesome, and aromatic preparation combining tender mutton with a nutritious blend of broken wheat and lentils. Slow-cooked to perfection, it delivers deep flavors, creamy texture, and comforting warmth—perfect for a hearty meal.


Ingredients

  • 750 gms Mutton with bone
  • 8 nos Green chillies
  • 35 gms Ginger garlic paste
  • 10 gms Turmeric powder
  • 8 gms Cinnamon sticks
  • 8 gms Cloves
  • 8 gms Green cardamoms
  • 5 gms Royal Cumin
  • 15 gms Black pepper corns
  • 10 gms Salt – to taste
  • 250 ml Water

For Grain & Dal Mix:

  • 100 gms Daliya (broken wheat)
  • 50 gms Urad dal (split black gram)
  • 50 gms Toor dal (pigeon peas)
  • 25 gms Chana dal (bengal gram)
  • 25 gms Yellow moong dal
  • 20 gms Rice
  • 5 gms Salt – to taste
  • 200 ml Water

For Cooking & Garnish:

  • 200 ml Oil
  • 100 gms Onions (finely sliced)
  • 5 nos Green chillies (slit)
  • 1 bunch Coriander leaves
  • ½ bunch Mint leaves
  • 5 gms Black pepper corn powder
  • 300 ml Curd (beaten smoothly)
  • 75 ml Pure ghee
  • 100 gms Deep fried onions
  • 5–6 nos Lemons (cut into halves)

 Method

Step 1: Soak Broken Wheat

Wash and soak the broken wheat (Dalia) for 30 minutes. Trim excess fat from the mutton and wash thoroughly. Add mutton, slit green chilies, ginger garlic paste, salt, turmeric powder, and water into a pressure cooker. Fry onions until golden brown and set aside.


Step 2: Pressure Cook Mutton

Add ginger garlic paste, salt, red chilli powder, garam masala, and turmeric to the mutton. Pressure cook for 8–10 minutes, then simmer for 15–20 minutes. Shred the mutton and keep aside.


Step 3: Cook Daliya & Dals

Boil broken wheat with urad dal, chana dal, toor dal, yellow moong dal, ginger garlic paste, turmeric, green chilies, and peppercorns until fully cooked and water is absorbed. Blend lightly for a coarse texture.


Step 4: Cook Mutton with Spices

Heat oil in a pan, add cinnamon, cloves, cardamom, cumin, and sauté. Add shredded mutton, green chilies, coriander, and cook for 2–3 minutes. Add curd and sauté for 10–15 minutes. Add water and bring to a boil.


Step 5: Combine & Slow Cook

Add the blended dalia-dal mixture into the mutton. Mix well, adding ghee gradually. Simmer on low heat for at least 30 minutes until thick and flavorful.


Chef Tips

  • Slow cooking is key—this enhances flavor and gives a creamy consistency.
  • Use bone-in mutton for richer taste and natural stock.
  • Do not over-blend the dalia mixture; a slightly coarse texture gives authenticity.
  • Add ghee gradually to balance richness without making the dish greasy.
  • Garnish just before serving to retain freshness and aroma.

 Service Suggestion

Serve hot, garnished with deep-fried onions, fresh mint, coriander leaves, and a squeeze of lemon. Pair with chilled curd or a simple salad for balance. This dish is perfect for festive meals or special gatherings.

Chef of the Day – Mr. GAVIN (BCTCA 2nd Sem), IIHMCA

A passionate and diligent young culinary aspirant, Mr. Gavin showcases exceptional skill and dedication in the kitchen. His selection as Chef of the Day at IIHMCA reflects both talent and commitment to the art of cooking.


 Join IIHMCA

Kickstart your culinary journey with IIHMCA—where passion meets professional excellence. Learn from experts, gain hands-on experience, and become the next Chef of the Day!

 
Categories Recipes

GUTTI VANKAYA KOORA


Introduction

Gutti Vankaya Koora is a classic Andhra-style delicacy made with tender brinjals stuffed with a rich, spicy masala and slow-cooked to perfection. Known for its bold flavors and aromatic spices, this dish is a staple in traditional Telugu households and pairs beautifully with rice or roti.

Ingredients

  • 500 gms           Brinjal
  • 100 gms           Tamarind Paste , big lemon size
  • 250 gms           Onions , ½ sliced thin & ½  chopped finely

 Ingredients to Roast & Grind

  • 6 nos                 Fresh Red Chilli , dry, roast and ground
  • 75 gms              Raw Peanuts  
  • 30 gms             Sesame seeds
  • 45 gms             Fresh coconut , grated
  • 25 gms             Coriander Seeds
  • 10 gms             Cumin seeds
  • 4 nos                Cardamom Seeds
  • 12 gms             Garlic cloves
  • 15 gms             Chana dal
  • 12 gms             Turmeric powder
  • 15 gms             Red chilies powder
  • 12 gms             Salt


Ingredients for Tadka

  • 75 ml                Sunflower Oil
  • 2 nos                Bay leaf
  • 10 gms             Mustard seeds
  • 6 gms               Cumin seeds
  • 5 nos                Red chilies whole
  • 6 nos                Green chilies slit
  • 1 sprig              Curry leaves

Method:

  1. Take small brinjals and slit them twice diagonally ¾ th long.
  2. On a medium flame in a deep pan, bring tamarind extract and salt in sufficient water to boil. Switch off flame and drop the brinjals in and close the lid. Let it sit for 10 minutes.
  3. Take another pan with oil, shallow fry onions till soft. Wet grind with a little tamarind-salt water
  4. Take a kadai to dry roast all the ingredients mentioned under roast and grind over medium flame. Use a mixer grinder to make semi fine powder. Mix turmeric, chilli powder and salt as required to this powder.
  5. Mix this powder with wet ground sautéed onions. Add a small amount of tamarind- salt water to make very thick paste and fill inside the brinjals. Keep aside.
  6. Prepare tadka with oil. Add in jeera, mustard seeds, bay leaves, red chilies, slit green chilies & curry leaves. When they splutter, add stuffed brinjals and fry for 2-3 minutes on a medium heat.
  7. Mix remaining gravy and more of water/ mix of tamarind and salt water and add to kadai. Bring it to boil over low flame.
  8. Sauté carefully such that the gravy doesn’t come out of the brinjals. Switch off the flame when gravy thickens and brinjals appear cooked.

Chef Tips

  • Choose small, fresh, and firm brinjals for best taste and presentation.
  • Do not cut the brinjals fully—keep them intact with a cross slit for stuffing.
  • Roast spices and peanuts lightly before grinding to enhance flavor.
  • Cook on low flame after stuffing to allow the masala to absorb היט into the brinjals.
  • Add a little tamarind pulp or jaggery to balance spice and tanginess.

Service Suggestions

Serve hot with steamed rice and a drizzle of ghee for an authentic experience. It also pairs well with chapati or phulka. Garnish with fresh coriander leaves and serve alongside sliced onions and lemon wedges for extra zing.

Chef of the day

Mr.MANIDEEP REDDY (BCTCA 2ND SEM) is a dedicated and diligent, young aspirant who is exceptionally good at culinary arts. IIHMCA has selected him as the Chef of the Day.

Join IIHMCA

Turn your passion for cooking into a profession with IIHMCA. Learn traditional and modern culinary techniques from expert chefs and build a successful career in the hospitality industry!


Categories Recipes

WAGAMAMA CHICKEN NOODLE CURRY

Introduction

Wagamama Chicken Noodle Curry is a comforting, modern Asian dish that combines tender chicken, noodles, and a rich coconut-based curry broth. Inspired by the bold flavors served at Wagamama, this dish blends Japanese-style simplicity with Thai curry influences—resulting in a balance of spicy, creamy, and slightly sweet flavors.

Ingredients

  •  2 nos Chicken breast
  •  2 nos Garlic clove, minced
  •  ½ inch  Fresh ginger, minced
  •  15 ml Vinegar
  •  5 ml Soy sauce
  •  15 gms Chopped onions
  •  2 nos Pak choi, chopped in half lengthwise
  •  200g  Fresh ramen or egg noodles
    For The Broth
  •  20 gms Sriracha chilli sauce
  •  20 gms Light soy sauce
  •  5 ml Sesame oil
  •  10 gms Sugar
  •  150 ml Chicken stock
  •  300ml  Boiling water
    For The Garnish
  •  20 gms Red onion, finely sliced
  •  1 no Lemon wedge
  •  3 sprigs Fresh coriander, roughly chopped
  •  2 nos Fresh red chillies, finely sliced
  •  3 gms Toasted sesame seeds
    Method:
    1. Clean and score the chicken breast. Marinate the chicken breast with half of the chopped garlic,
    ginger, soy sauce and vinegar. Keep it aside for 15 mins.
    2. Place a non-stick frying pan on medium heat. Drizzle in some oil.
    3. Now place down chicken breast on to the hot oil. Fry on each side for 5 minutes or until golden. 
    Take it out and rest the chicken breast.
    4. To the same pan, add chopped onions and sauté for few minutes, till the onions turn translucent.
    Add in chopped garlic, ginger, and sliced pak choi. Place lid onto the pan and cook for a few
    minutes or until pak choi is al dente. Add a splash of water so that the pak choi steams slightly.
    5. Once al dente, turn off the heat, leave the lid on and set the pan aside. 
    6. Meanwhile, prepare all of your garnish ingredients.
    7. Boil the fresh noodles for a couple of minutes and then drain and set aside. 
    8. For soup broth, add sriracha chilli sauce, light soy sauce, sesame oil, sugar, and chicken stock to
    ramen bowl and give it a good mix. 
    9. Boil kettle and then pour the boiled water into bowl about 1 ½ inches from the top of bowl and
    give everything a good mix. Season according to your taste.
    10. Slice chicken and get garnishes. 
    11. Place noodles into soup bowl followed by your chicken and pak choi.
    12. Top with red onions, coriander, spring onion, red chillies, and a wedge of lime.

Chef Tips (Pro Level)

  • Balance is key: curry = spicy + sweet + salty + creamy
  • Always cook curry paste in oil first (unlocks aroma)
  • Use fresh ginger + garlic, not paste, for restaurant flavor
  • Don’t overcook noodles → they should stay springy
  • Finish with a squeeze of lime for brightness

 Service Suggestions

  • Serve in a deep ramen bowl
  • Garnish with:
    • chopped spring onions
    • chili oil drizzle
    • sesame seeds
  • Pair with:
    • light iced tea or lemonade
  • Serve immediately → noodles absorb sauce quickly

chef of the day

Student selected for the Chef of the day is Mr.  ASEEM ( BCTCA 6TH SEM ) of Indian Institute Hotel Management and Culinary Arts for showcasing exemplary skills. He is very talented student, always striving to learn the art of cooking.

Join IIHMCA Hyderabad

Begin your journey in culinary arts and hospitality with Indian Institute of Hotel Management and Culinary Arts and build a successful career in the industry.